

Everything up to this point has been setup. You've connected an account, built a list, maybe saved a template. This is the guide where it all comes together and an actual campaign goes out the door. It looks like a lot of steps written down, but in practice it takes a few minutes once you know where everything lives, and by the end of this walkthrough you'll have sent your first real campaign.
Where to Find This Page
Open Campaigns from your sidebar and click 'Create Campaign.' You will be taken to a form with several sections. We walked through the steps you'll want to go through to complete it.
Step 1: Write the Message
Get started by providing the basic information. Set up your campaign name (for your reference only), type in the subject, body of the message, your sender name and email address.
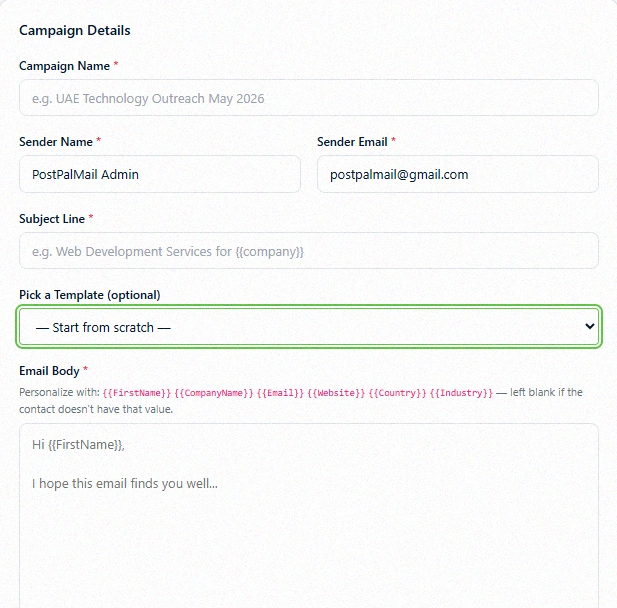
Should you have saved a template prior from the Template Library, you can skip this step. Select it here and the subject and body load in automatically, personalization tokens included. From there you can still tweak the wording if something needs adjusting for this specific send.
Step 2: Choose Who Receives It
This is where PostPalMail gives you more flexibility than most people expect. You've got three ways to define your recipients, and you only need to pick one.
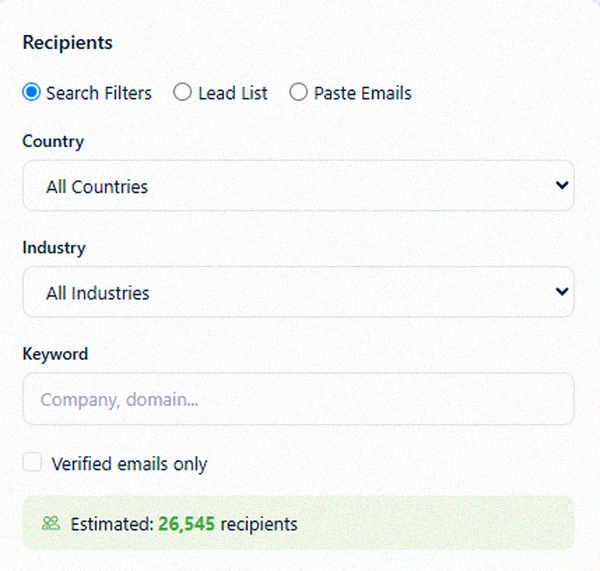
- Use a Lead List: the simplest option if you've already built one, whether Static or Smart. Select it from the dropdown and every contact in that list becomes a recipient.
- Use Search Filters: skip the list entirely and define your audience right here, using Country, Industry, and Keyword filters, plus a 'Verified only' option if you want to stick to contacts that have already passed email verification.
- Paste Your Own Emails: If you have a specific group of addresses you want to email just one time you can put them directly into the box. No need to create a list first.
Either way the form will show you an estimated number of recipients before you send. That way you always know about how people this email campaign will reach.
Step 3: Pick the Account You're Sending From
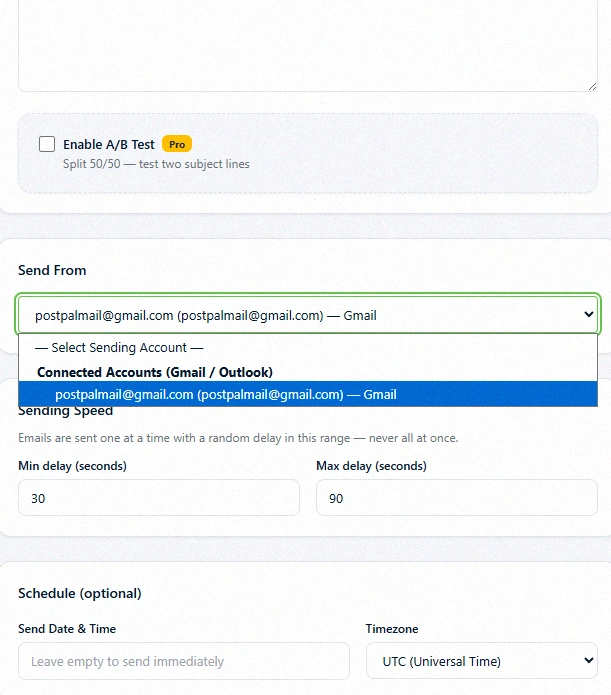
Choose which connected account this campaign sends through, your Gmail, your Outlook, or a linked SMTP account. If you haven't connected one yet, our guide on connecting Gmail or Outlook covers that in full.
Step 4: Let PostPalMail Send It Safely
Right next to the sending account, you'll notice a delay setting, a minimum and maximum number of seconds between each email, defaulting to somewhere between 30 and 90 seconds. This isn't a random detail buried in the form, it's actually one of the more important parts of the whole process.
Sending one hundred or two hundred emails all at once one after another does not look like human behavior to an email provider. It can quietly damage your sending reputation. Adding a pause, between each email mimics how a real person actually sends an email and this keeps your campaign in inboxes instead of spam folders. This is also exactly why a bulk send can run safely in the background. It's not blasting everything in one second, it's working through your list steadily, and you're free to close the tab and get on with your day while it does.
Optional: A/B Testing
If you want to test two versions of your message against each other, there's an A/B Testing toggle. Turn it on, and you can enter a second subject line and body alongside your original. PostPalMail splits your recipients between the two versions, so you can see which one performs better before committing to it for a bigger send next time.
Optional: Schedule for Later
Not ready to send away? You can schedule the campaign, for a date, time and timezone instead of sending it immediately. This works well if you know your audience checks email at a time of day. If you just want to set everything up ahead of time and have it go out automatically later.
Sending and What Happens Next
Once you are happy, with everything click send. The campaign moves to your Campaigns list, where you can open the campaign any time to check on progress. From there, a few controls are available if you need them:
- Pause it, if you need to stop sending temporarily without cancelling the whole campaign
- Resume it, to pick back up exactly where it left off
- Stop it, if you need to cancel the remaining sends entirely
- Retry Failed, to automatically resend to any recipients that bounced or failed the first time
- Export Report, to download a summary of how the campaign performed
A Simple Walkthrough
Here's the entire process from start to finish, using a Lead List as the recipient source:
- Open Campaigns and click Create Campaign
- Name it, then load a saved template or write your subject and body directly
- Select your Lead List as the recipient source
- Choose your connected Gmail account as the sender
- Leave the delay range at its default setting
- Click send, and the campaign starts working through your list in the background
What to Do Next
Once your campaign is out, the natural next step is watching how it performs and following up with anyone who hasn't replied. Both of those need their special guide so make sure to watch for our new articles, about sequences and analytics.
Conclusion
That’s the picture, from a blank form to a campaign quietly running in the background working through your list. Every step before this one, connecting your account, building a list, saving a template, was building toward this exact moment. Head to Campaigns and send your first one today.
Disclaimer: This article is, for informational purposes. It is meant to help new users send their campaign in PostPalMail. Default settings, delay ranges and available options may change over time. Always refer to the Campaigns page inside the platform for the latest details, about PostPalMail.