

Before PostPalMail can send a single email on your behalf, it needs somewhere to send it from. That's the whole point of this step, connecting a real email account so your campaigns go out looking like they came from you, not from some unfamiliar system address. This guide walks you through exactly how to do it, including the one part that trips up almost every new user: a scary-looking warning from Google that isn't actually anything to worry about.
Where to Find This Page
Head over to Settings → Connected Accounts. You'll notice it sits in the same tab bar as your Profile and your saved SMTP Accounts, so it's easy to find again later if you ever need to add a second account or check on an existing one.
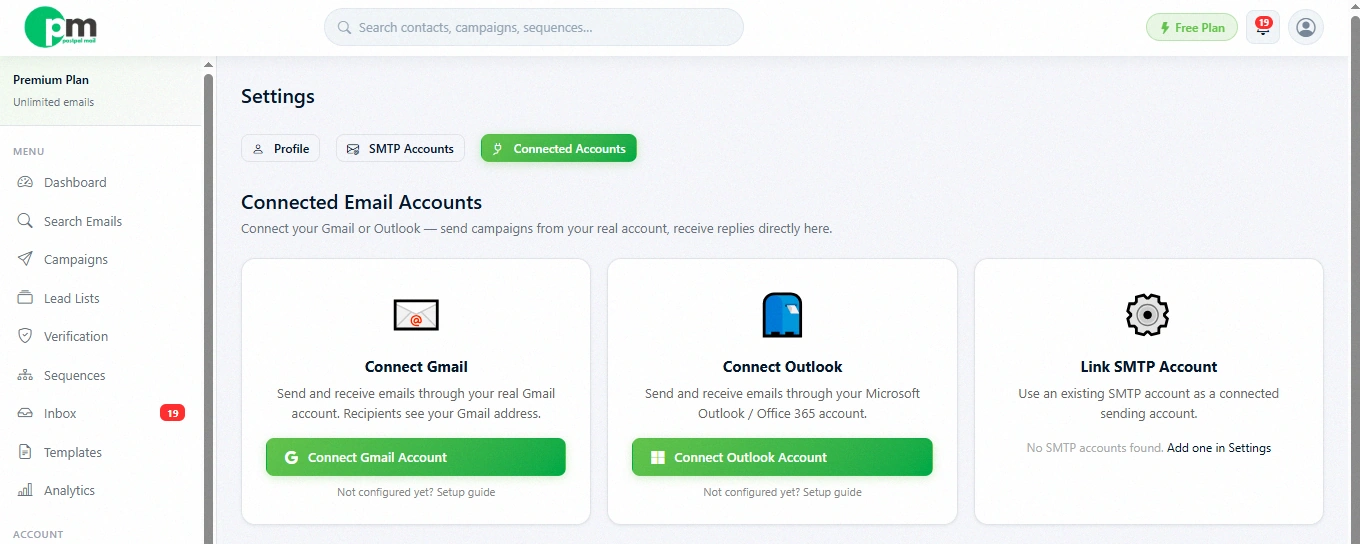
This page shows three ways to connect an account: Connect Gmail Account, Connect Outlook Account and Link SMTP Account. I want to choose the one that matches the email address from which the account wants to send. It is very simple to decide.
Option 1: Connecting Gmail
Click the "Connect Gmail Account" button. Before anything occur’s you will see a short pop-up that explains what to expect next. This is not just words. It is there, for a reason so read it before clicking through.
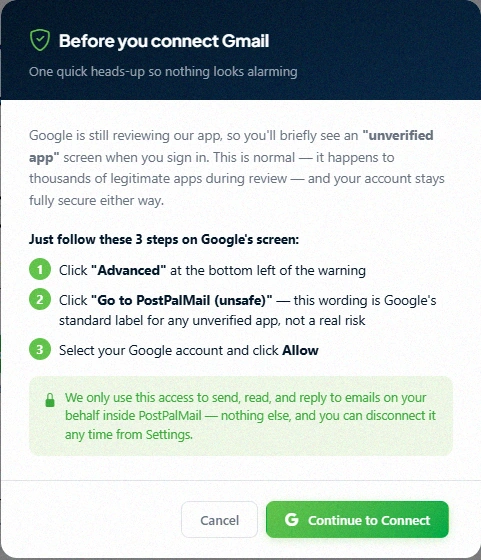
Here's the part that catches people off guard: right after you sign in with Google you'll briefly see a screen warning that the app is 'unverified.' This looks alarming the time you see it but it’s completely normal. It happens because Google is still, in the process of reviewing PostPalMail. This is something that happens to thousands of safe apps while they wait for approval. Your account stays fully secure the whole time. To get past it, just do the following:
- Click 'Advanced' at the bottom left of the warning screen
- Click 'Go to PostPalMail (unsafe)': this exact wording is Google's standard label for any app still under review, not a real risk
- Select your Google account and click 'Allow'
That's it. PostPalMail only uses this access to send, read, and reply to emails on your behalf inside the platform nothing else and you can disconnect it at any time from this same Settings page if you ever change your mind.
Option 2: Connecting Outlook
If you use Microsoft Outlook or an Office 365 email address click on "Connect Outlook Account." You will be taken directly to the Microsoft sign‑in page. On that page log in. Give permission just as you would for any app that connects to your Outlook account. There is no warning screen to go through. Microsoft’s process is simpler and more straightforward.
Option 3: Linking an Existing SMTP Account
If you already manage your own SMTP setup say, through a custom domain or a business email provider, you don't need Gmail or Outlook at all First add your SMTP details, in Settings → SMTP Accounts. Then return to this page. Click "Link SMTP Account" to connect SMTP as a sending account. If you have not added SMTP yet this section will simply prompt you to add SMTP and then link SMTP from there.
What Happens After You Connect
Once an account is connected, PostPalMail explains exactly what to expect right there on the page, and it's worth repeating here because it answers most people's first worry, 'will this look weird to the people I email?'
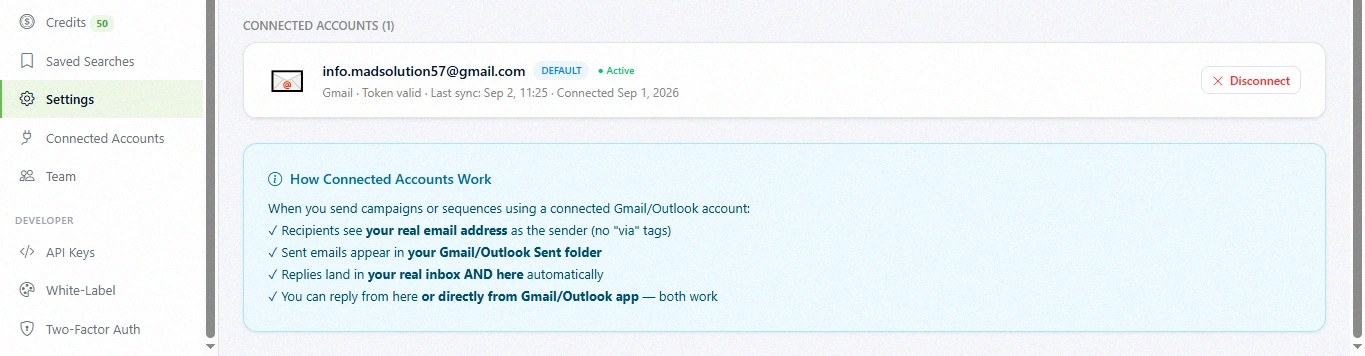
- Recipients see your real email address as the sender, with no odd 'via' tag attached
- Every email you send through a campaign or sequence also appears in your actual Gmail or Outlook Sent folder
- Replies land in both your real inbox and your PostPalMail Inbox automatically
- You can reply from either place, inside PostPalMail, or directly from your own Gmail/Outlook app and both work fine
In short, nothing about the experience looks automated or third-party to the person receiving your email. It looks exactly like you sent it yourself, because PostPalMail is just doing the sending on your behalf.
Managing Multiple Accounts
If you connect more than one account over time, you can choose which one acts as your default sender, and switch it whenever you like. Each connected account also has a simple 'Disconnect' option, so removing access later if you switch email providers, for instance, takes one click and doesn't require deleting anything else in your PostPalMail account.
Is It Safe to Connect My Email?
This is the common doubt and it makes sense. The truth is: PostPalMail only asks for the permissions required to send, read and reply to emails using your connected account. It does not get access to your Google or Microsoft account your files or anything else. Since you can turn off the access right away, from Settings whenever you want you are never stuck.
A Simple Walkthrough
Here is the quick version of the process, from pressing the button to having everything ready to send:
- Go to Settings → Connected Accounts
- Click Connect Gmail Account (or Connect Outlook Account, or Link SMTP Account)
- If using Gmail, read the quick pop-up, then click through the 'Advanced → Go to PostPalMail (unsafe) → Allow' steps on Google's screen
- Land back on the Connected Accounts page with your account now listed and active
- Head straight to Campaigns and start sending the connection is ready to use immediately
Conclusion
Connecting your Gmail or Outlook account is the last real setup step before you can start sending, and despite that one alarming-looking Google screen, the whole process takes under a minute. Once it's connected, everything else, campaigns, sequences, replies runs through your real address exactly the way you'd expect. If you haven't connected an account yet, head to Connected Accounts now, and you'll be ready to launch your first campaign right after.
Disclaimer: This article is for general informational purposes only and is meant to help new users connect an email account to PostPalMail. Screens and verification steps shown by Google or Microsoft may change over time, since these are controlled by those companies, not PostPalMail always follow the exact prompts shown on your own screen.